Page Peel is a popular page flip effect that when your cursor is passing over it will show "what's behind" as if it would be a book.
There are many ways to do this, many of them use flash files which makes it less customizable, however, the one that we will see in this post is made with jQuery.

Regularly the content that is "behind" it is an image for subscribing to feed but you can put any image and link to any page.

page peel, blogger gadgets

To add this page curl effect on your blog: 

1. Go to Template > Edit HTML and before </head> paste the script:
<script src='http://ajax.googleapis.com/ajax/libs/jquery/1.10.2/jquery.min.js' type='text/javascript'/>

<script>
//<![CDATA[
$(document).ready(function(){
$("#pageflip").hover(function() {
$("#pageflip img , .msg_block").stop()
.animate({
width: '307px',
height: '319px'
}, 500);
} , function() {
$("#pageflip img").stop()
.animate({
width: '50px',
height: '52px'
}, 220);
$(".msg_block").stop()
.animate({
width: '50px',
height: '50px'
}, 200);
});
});
//]]>
</script>
2. Then before ]]></b:skin> paste these styles:
/* Page Flip
----------------------------------------------- */
#pageflip {
position: relative;
right: 0;
top: 0px; /* Change to 30px if you have the navbar (navigation bar) */
float: right;
z-index:9;
}
#pageflip img {
width: 50px;
height: 52px;
z-index: 99;
position: absolute;
right: 0;
top: 0;
-ms-interpolation-mode: bicubic;
}
#pageflip .msg_block {
width: 50px;
height: 50px;
overflow: hidden;
position: absolute;
right: 0;
top: 0;
background: url(http://oi44.tinypic.com/2hheno6.jpg) no-repeat right top;
}
#pageflipMirror {
position: static;
right: 0;
top: 0;
float: right;
}
3. Finally, paste after <body> or:
<body expr:class='&quot;loading&quot; + data:blog.mobileClass'>
The following code:
<div id='pageflip'>
<a href='http://name-of_your_blog.blogspot.com/atom.xml'>
<img src='http://oi40.tinypic.com/10fqnav.jpg' style='width: 50px; height: 52px; overflow-x: hidden; overflow-y: hidden;'/></a>
<div class='msg_block' style='width: 50px; height: 50px; overflow-x: hidden; overflow-y: hidden; '/>
</div>
In blue you will see a URL - this is the URL of the image that, in this case, is an invitation to subscribe to the feed. You can change it later to another (should be of the same size) if you want.
In red you can see where the name of your blog should be added, that will be the link to the feed of your blog when the user is giving a click on the image behind, but you can put any URL in case you want to link to another page.

And that's it. Save the template.

Remember that uses jQuery, so you should only have one version of it, and if you use Scriptaculous or Mootools, you should apply some changes.

 8AAU2XTXFSX3

As each day there are lots of new users joining the world of blogging, is necessary to discuss about some basic topics that bring up some recurring questions such as how we could get the URL of an image?

On the Internet there are many both free as well as paid web hosting where we can host images, but since we use Blogger then there is nothing better than using the same hosting service that Google gives us and that is Picasa.

The fastest way to upload an image is by going to the Blogger post editor. From your Blogger Dashboard, go to your blog, then click on the New post button. And preferably from the Edit HTML tab, click on the image icon.


Every person wants to make their holidays special so that they can easily make their holiday experience memorable throughout their life. If you also want to make your seasonal vacations memorable, then you must select a perfect vacation spot for yourself that can simply provide you with a soothing and life time memorable holiday experience. There are numerous exotic and majestic vacation spots that are located in different parts of the world but selecting a perfect vacation spot is really a very tough jog. Most of the people face a lot of problems in selecting a perfect vacation spots for themselves.
Well, if you are also facing problems in selecting a perfect vacation spot for yourself, then you must go through this article of mine. Today, most of the people select the natural vacation spots like lakes, beach sides, water falls, valleys and mountains that are located in different parts of the world. These natural vacation spots can simply prove out to be the best holiday destinations for most of the families. You can also enjoy your seasonal vacations with your families in the midst of natural beauty so that you can easily avail yourself with a life time experience.
Port Campbell National Park is one of the most popular national parks that is located in the Victoria of Australia. A large number of tourists from different parts of the world as well as the local residents of Australia love to enjoy their holidays on the landscapes of this national park. This national park of Australia is also located at a distance of about 190 kilometers in the South Western part of Melbourne.
It is one of the most protected national parks of Australia and it is well enhanced with a series of array cliffs. These sheer cliffs are the major attraction for the visitors of this park. This Australian national park is completely subjected to cliff tops and the salt laden air. The landscapes of this park are mainly exposed to the harsh weather conditions which are mainly supported by the Southern Ocean.
You can also notice the various types of heath lands and fragile grasslands inside this park. This park provides many adventurous attractions to its visitors like fishing, hunting and camping. You can easily stay here safely with your family and your friends and avail yourself with the true camping experience. So, this was all about the most visited Port Campbell National Park of Australia. Make sure that you visit this natural vacation spot with your family members and your friends during your vacations.


http://maximroad.blogspot.co.id/
And the post title says it all. There are gadgets that sometimes we want to be visible only to us and not to our blog readers, perhaps a Survey already ended that we want to keep, a counter, or any gadget that while we customize, we don't want anyone else to see until the final result is ready.

blogger widgets, blogger tutorials
 The procedure is simple, we just have to add two lines to our gadget that we want to hide.
jGlideMenu is a vertical menu that can be dragged and dropped so that the reader can place it anywhere, and in addition, he can browse through the tabs in a very peculiar manner that comes with a sliding effect giving a sexy touch.

One of the advantages is that it can store a large number of links and can be removed anytime if we want.


vertical menu, menu for blogger
In the previous post we saw how to make the blog's background fill the screen regardless of the resolution of the monitor. The method that we'll use now with jQuery is a plugin called BackStretch which also has the option of creating a slideshow of pictures as a blog wallpaper without losing the property of adjusting to the width and height of the screen.


slideshow for blogger, blogger widgets

What we will do in this entry is just this, try to make the blog's background to have some images that are changing, all with fade effect between each transition.
A constant question is how to make the background image of the blog always fill the entire screen regardless of the resolution of the monitor. And that is when we put a background image as measured by our monitor forgetting that there are actually monitors of all resolutions, very small and very large. So if we put an image according to our screen, there will be someone with a bigger monitor that surely will not see the whole picture or it will be repeated, and in this case, using very small monitors, the image will be seen incomplete.


blogger tricks, blogger tutorials, blogger blogspot
Blogger allows us to easily add a "Popular Posts" widget, that we select from its list of gadgets, and we can do that by going to the "Layout" of our Blog.

This gadget, as the name implies, shows which are the most visited blog posts, and you can set it to display the info you want in four possible combinations: (1) only the title of the post, (2) a thumbnail of the image and the post title, (3) post title with a summary, and (4) post title with a thumbnail and a post snippet.

This is an element that you shouldn't miss in your blog because it encourages your visitors to navigate through your content, which can result in higher income if you're monetizing your blog because it would generate an increase in the number of pages visited, and in turn, can attract the users' interest to subscribe to the blog and to read interesting content.
Some of you might have wondered how to put a video to play in the blog's background, so that instead of having just a color or an image, to have a video. We can do this thanks to the jQuery plugin Tubular that lets you use a YouTube video as a background of a web page.

Although the result can be very original and attractive, I must say it has three drawbacks: they can not be silenced, if the video has ads, they will also appear, and it can slow the loading time of the blog, so if anyone wants to use it, may consider putting it only on special occasions, or on blogs that load very quickly.

Also it can be done in HTML5, the problem with this method is that you need to load the video in 3 different formats (.mp4, .webm and .ovg) along with a picture for browsers that do not support them, so this YouTube option seems more practical to me, despite the drawbacks.

From the Compose tab of a Blogger post, we can create numbered lists using the "Numbered List" tool.


blogger gadgets, blogger widgets

A numbered list is achieved through the HTML code of a "ordered list". You don't have to worry about adding the HTML, because the editor does it for you by using this tool. If you go to the HTML tab, you'll see that the list you created appears something like this:
   <ol>
<li>The content of the 1st. element</li>
<li>The content of the 2nd. element</li>
<li>The content of the 3rd. element</li>
<li>The content of the 4th. element</li>
    etc...
  </ol>
This tool will automatically number each element of the list taking an "order", hence the name "ordered lists in HTML". In each element a number is successively generated (from 1 onwards), though you can not see this in the HTML code.
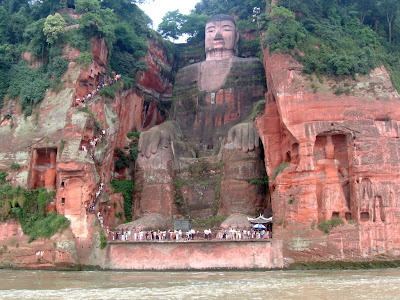
The stone carved figure was designed and constructed by Haithong. He was the biggest follower of Buddha and when he was collecting the amount for building the statue he was greatly harassed. So he donated his eyes to shoe how strong his beliefs were. When he died the construction was left in between then after a huge span of time, a disciple of Haithong thought of completing the work of his master. Thus it was finally completed by him in 803.
The figure is beautifully designed and carved out. It stands erect with the Buddha resting his both the hands on his knees. Below the statue visitors can enjoy the beauty of the head. The figure is said to be located in the heart of the mountain ranges. It is not only known for its beautiful artistry but also for the calm and still posture of Lord Buddha. The coiled hair has 1021 buns which are magnificently embedded. The most attractive feature is the drainage system which is efficiently designed to drain all the rain water during the rainy season.
As it is one of the well renowned monuments therefore it captures the attention of both the local visitors and also people from abroad. But the pollution has done damage to the statue. The figure has been polluted by the factories and the various power plants. It would have been washed away if necessary steps had not been taken by UNESCO and the government of China. If you need to go to Leshan you can easily get trains to route you. The railway station is situated about 31 kilometers from the Leshan City. Also if you want you also take a bus as it takes only two hours to reach there. So you have ample of options to reach there. According to me if you are religious and spiritual you must visit the Leshan Giant Buddha. One will find peace in the atmosphere and also an environment which will take you close to the divine power.


http://maximroad.blogspot.co.id/
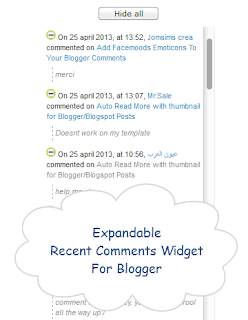
This Expandable Recent Comments is a very accessible widget that can be collapsed or expanded through user interaction, so that now, we don't have to click on the commenter or post title link in order to see the content of a comment.

recent comments widget, blogger gadgets, blogspot tricks

The expanding content can be shown or hidden by clicking on the plus/minus icon or by pressing the "Show all" or "Hide all" button at run time.

How To Add The Expandable Recent Comments Widget to Blogger

Step 1. Log in to your Blogger dashboard and go to Layout > Click on "Add a Gadget" link


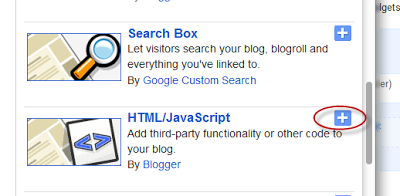
Step 2. From the pop-up window, scroll down and click on the HTML/JavaScript widget


Step 3. Copy and paste this code inside the empty box:
<style type="text/css" media="screen">
.row-aa {        background: #f2f2f3; }
.row-bb {        background: #F8F5F1; }
.row-div { 
  margin:0px;
  padding:5px;
}
.comment-header {
  font-size:0.9em;
//  border:1px solid #E0E0E0;
//  background-color:#F3F3F3;
  padding:4px;
  margin-top:10px;
  margin-bottom:5px;
}
.comment-box {
  margin:0px;
  padding:0px;
  font-size:0.9em;
  height:500px;
  overflow:auto;
}
.comments1  { 
//  background: #F3F3F3;
  padding:3px;
  border-left:1px dashed #A6A6A6;
  color: #888888;
  font-style: italic;
  padding-top:4px;
  margin-bottom:5px;
}
.comment-footer {
  text-align:center;
  font-size:0.9em;
  padding:4px;
  margin-top:5px; 
}
</style>

<div style="text-align: center" class="comment-header"><input class="comment-button" id="commshowall" type="button" onclick="if (this.value == &#39;Show all&#39;) { unfold_all(this); this.value=&#39;Hide all&#39;; } else { fold_all(this); this.value=&#39;Show all&#39;; }" style="width:8em;font-size:1em;font-family:Verdana,sans" value="Show all" /></div>

<div class="comment-box">
<script type="text/javascript" src="http://helplogger.googlecode.com/svn/trunk/expandable-recent-comments.js"></script>
<script type="text/javascript"  src="http://awesomerich.blogspot.com//feeds/posts/default?start-index=1&max-results=999999&alt=json-in-script&callback=showrecentposts">
</script>
<script type="text/javascript"  src="http://awesomerich.blogspot.com//feeds/comments/default?start-index=1&max-results=999999&alt=json-in-script&callback=showrecentcomments">
</script>

</div>

Note: Replace http://awesomerich.blogspot.com/ with your blog/site address.

Step 4. Save your widget and you're done!
In the last tutorial, you learnt How to Add Different Backgrounds in Blogger Posts. Now this tutorial, will show you how you can have a different background for each of your page, thus giving your pages their own unique look. 

How to Add Different Background In Blogger Posts/Pages

Step 1. Log in to your Blogger Dashboard, then go to Template > Edit HTML.