Showing posts with label Gadgets. Show all posts
There are many types of galleries for images that we find on the net, but we rarely see one showing images so differently like this one.

Those using Mac OS X will surely find a lot of similarity with TimeMachine and those who don't, I'm sure will enjoy this type of effect for viewing images.

I'm talking about Spacegallery, an image gallery done with jQuery in which images are being displayed one after another when you click on them.

To use this gallery follow the steps below:

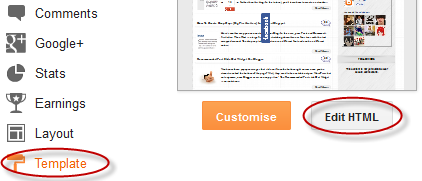
Step 1. Log in to your Blogger Dashboard, click on your blog and then go to Template and click on the Edit HTML button.


Step 2. Search using CTRL + F keys for the </head> tag and before it paste the following:
<script src='http://ajax.googleapis.com/ajax/libs/jquery/1.10.2/jquery.min.js' type='text/javascript'/>
<script src='http://helplogger.googlecode.com/svn/trunk/SpaceGallery/eye.js' type='text/javascript'/>
<script src='http://helplogger.googlecode.com/svn/trunk/SpaceGallery/utils.js' type='text/javascript'/>
<script src='http://helplogger.googlecode.com/svn/trunk/SpaceGallery/spacegallery.js' type='text/javascript'/>

<script type='text/javascript'>
//<![CDATA[
(function($){
var initLayout = function() {
var hash = window.location.hash.replace('#', '');
var currentTab = $('ul.navigationTabs a')
.bind('click', showTab)
.filter('a[rel=' + hash + ']');
if (currentTab.size() == 0) {
currentTab = $('ul.navigationTabs a:first');
}
showTab.apply(currentTab.get(0));
$('#myGallery').spacegallery({loadingClass: 'loading'});
};

var showTab = function(e) {
var tabIndex = $('ul.navigationTabs a')
.removeClass('active')
.index(this);
$(this)
.addClass('active')
.blur();
$('div.tab')
.hide()
.eq(tabIndex)
.show();
};

EYE.register(initLayout, 'init');
})(jQuery)
//]]>
</script>
Screenshot
Note: if you have already added jQuery in your template, then delete the line in red.

Step 3. Search for ]]></b:skin> (CTRL + F) and when you found it, click on the arrow next to it:


Paste just above ]]></b:skin> the following CSS style:
#myGallery {
width: 100%;
height: 400px;
}
#myGallery img {
border: 2px solid #52697E;
}
a.loading {
background: url(https://blogger.googleusercontent.com/img/b/R29vZ2xl/AVvXsEgiZEaAbj3U4gIFZntPi-3o81270rlcpy2LxYLLsW0-LKt6McuB7fk58ZD1ug0_va5oAt7rA0nWLdaZitwCkfrX67SJ4b_KdYlsQgvfJ7VeHVVCGt54LUfVicdC30mAzvYbhMLmpgwGAHA/s1600/ajax_small.gif) no-repeat center;
}
.spacegallery {
position: relative;
overflow: hidden;
}
.spacegallery img {
position: absolute;
left: 50%;
}
.spacegallery a {
position: absolute;
z-index: 1000;
display: block;
top: 0;
left: 0;
width: 100%;
height: 100%;
}

Step 4. Click on the Save template button

Step 5. Finally go to Layout > Add a Gadget > HTML/Javascript and copy-paste the code below:
<div class="spacegallery" id="myGallery">
<img src="Image URL"/>
</div>
Note: In case you want to add this slideshow inside a post, then create a new post and paste the code in the HTML section

Replace the Image URL text with the URLs of the images of your gallery, keeping in mind that the last image is the first to be displayed.

And so you can enjoy this simple image gallery on your blog, and although it has no display options or settings, is without a doubt a gallery that will draw the attention of your readers.
If you are using the Nabble forum in your blog is very likely that this gadget will interest you because, as the title says, it will show the lastest topics that have been published in your forum in a very similar manner to the recent comments gadget which uses the blog's feed.


nabble forum

First you should go to your forum and look at the bottom where it says Feeds, click there, then two links of the Feed will appear (the first being the Topics only Feed and the other one is Topics and replies), choose the one you want.
using nabble feeds to see latest forum topics

After this, log in to your Blogger Dashboard, go to Layout, click on Add a Gadget link, choose Feed from the gadgets list and paste the Feed URL you have selected inside the text box.

configure gadget feed in blogger

Click on Continue, and you only have to configure the parameters, then Save changes to see the results.
This is a very nice carousel slideshow made by Brian R. Miedlar which shows a gallery of images having a sliding effect that returns to the beginning once it gets to the last image.

To add this image carousel on your Blogger blog, follow the steps below:


image carousel

Step 1. Login to your Blogger Dashboard, go to Template and click on the Edit HTML button:


Step 2. Search using CTRL + F for the </head> tag.


Step 3. Just above the </head> tag, add this code:
<script src='http://www.google.com/jsapi'></script>
<script>
google.load("prototype","1.7.0.0");
google.load("scriptaculous", "1.9.0");
</script>


<script language='javascript' src='http://helplogger.googlecode.com/svn/trunk/Image Carousel/os.js' type='text/javascript'/>
<script language='javascript' src='http://helplogger.googlecode.com/svn/trunk/Image Carousel/carousel.js' type='text/javascript'/>
<script language='javascript' src='http://helplogger.googlecode.com/svn/trunk/Image Carousel/application.js' type='text/javascript'/>
Note: If you already have Scriptaculous and Prototype, it's not necessary adding the code in red.

Step 4. Now search for the following code:
]]></b:skin>
And just above it, add these styles:
.carousel {
position:relative;
clear:both;
left:20px; /* Distance from left */
margin-top:10px;
margin-bottom:20px;
border:2px solid #000; /* Carousel border */
background-color:#333333; /* Background color */
}
.carousel .navButton { cursor:pointer; display:block;
text-indent:-9999px;
background-repeat:none;
z-index:10;
}
.carousel .container {
position:absolute;
overflow:hidden;
}
.carousel .items {
position:absolute;  }
#Carousel2 {
height:88px; /* height of the container */
width:685px; /* width of the container */
}
#Carousel2 .container {
left:26px;
top:12px;
width:630px; /* width of the images container */
height:100px; /* height of the images container */
}
#Carousel2 .items { top:0; left:2px;
width:1700px; /* overall width of all the thumbnails */
}
#Carousel2 .item { height:70px; width:70px; float:left; clear:right; }
#Carousel2 .item .icon img { position:relative; left:0px; width:65px !important; height:65px; cursor:pointer;}
#Carousel2 .navButton { position:absolute; bottom:0px; width:24px; height:87px; }
#Carousel2 .navButton.previous { left:0px; background-image:url(https://blogger.googleusercontent.com/img/b/R29vZ2xl/AVvXsEhvXMQk-WetygnvM8oF1jWBJ3_0ohplahHsBFsBruq-iZ4g4oztuyv7Wix5N9adxkP2ZrF96Zm8Co1ZNIMof-2cMo4uPmsUX87sqyrTpxS2KEcSV4EIAdJAWThvslyrw9wSuPrSGf3SRw/s1600/button-left.png); }
#Carousel2 .navButton.next { right:2px; background-image:url(https://blogger.googleusercontent.com/img/b/R29vZ2xl/AVvXsEhyt3bDsExXMDVBVcznBQzLSLUmA3yuyqguvGq9STywUIskG9M_hFIsbCkET8ffuKegsjDTx8rpz-ewzwImctBj0akAj8IfKhjSL6JT1WyG9vk_P0_3z1-58MPDMKnUeCnWWSiATUzEBg/s1600/button-right.png); }
#Carousel2 .item .key { display:none;}
#Carousel2 .item .picture { display:none;}
Here, I have put some styles in green that can be customized as you wish, such as the border color and the background color. The arrows are images, so if you want changing their color or use other, you have to change the two URLs in blue.

The width of the carousel is of 685px, so below the header might look good. If you want to change the length then you have to change the /* width of the container */ (which is the size of the entire carousel), the /* width of the images container*/ (which is the area that shows the thumbnails) and the /* overall width of the thumbnails */ which is the actual width that occupy all the thumbnails together.

Step 5. Save the Template.

Step 6. Go to Layout > click on Add a Gadget link > choose HTML/Javascript from the pop-up box and paste the structure of the carousel:
<div id="Carousel2" class="carousel">
<div class="button navButton previous" style="display:none;">Back</div>
<div class="button navButton next" style="display:none;">Forward</div>
<div class="container">
<div class="items">

<div class="item">
<div class="key caption">Thumb</div>
<div class="icon">
<a href="link URL"><img width="65" height="65" src="image URL" /></a></div>
<div class="picture"></div>
</div>

<div class="item">
<div class="key caption">Thumb</div>
<div class="icon">
<a href="link URL"><img width="65" height="65" src="image URL" /></a></div>
<div class="picture"></div>
</div>

<div class="item">
<div class="key caption">Thumb</div>
<div class="icon">
<a href="link URL"><img width="65" height="65" src="image URL" /></a></div>
<div class="picture"></div>
</div>

<div class="item">
<div class="key caption">Thumb</div>
<div class="icon">
<a href="link URL"><img width="65" height="65" src="image URL" /></a></div>
<div class="picture"></div>
</div>

<div class="item">
<div class="key caption">Thumb</div>
<div class="icon">
<a href="link URL"><img width="65" height="65" src="image URL" /></a></div>
<div class="picture"></div>
</div>

<div class="item">
<div class="key caption">Thumb</div>
<div class="icon">
<a href="link URL"><img width="65" height="65" src="image URL" /></a></div>
<div class="picture"></div>
</div>

<div class="item">
<div class="key caption">Thumb</div>
<div class="icon">
<a href="link URL"><img width="65" height="65" src="image URL" /></a></div>
<div class="picture"></div>
</div>

<div class="item">
<div class="key caption">Thumb</div>
<div class="icon">
<a href="link URL"><img width="65" height="65" src="image URL" /></a></div>
<div class="picture"></div>
</div>

<div class="item">
<div class="key caption">Thumb</div>
<div class="icon">
<a href="link URL"><img width="65" height="65" src="image URL" /></a></div>
<div class="picture"></div>
</div>

<div class="item">
<div class="key caption">Thumb</div>
<div class="icon">
<a href="link URL"><img width="65" height="65" src="image URL" /></a></div>
<div class="picture"></div>
</div>

<div class="item">
<div class="key caption">Thumb</div>
<div class="icon">
<a href="link URL"><img width="65" height="65" src="image URL" /></a></div>
<div class="picture"></div>
</div>

<div class="item">
<div class="key caption">Thumb</div>
<div class="icon">
<a href="link URL"><img width="65" height="65" src="image URL" /></a></div>
<div class="picture"></div>
</div>

<div class="item">
<div class="key caption">Thumb</div>
<div class="icon">
<a href="link URL"><img width="65" height="65" src="image URL" /></a></div>
<div class="picture"></div>
</div>

<div class="item">
<div class="key caption">Thumb</div>
<div class="icon">
<a href="link URL"><img width="65" height="65" src="image URL" /></a></div>
<div class="picture"></div>
</div>

<div class="item">
<div class="key caption">Thumb</div>
<div class="icon">
<a href="link URL"><img width="65" height="65" src="image URL" /></a></div>
<div class="picture"></div>
</div>

<div class="item">
<div class="key caption">Thumb</div>
<div class="icon">
<a href="link URL"><img width="65" height="65" src="image URL" /></a></div>
<div class="picture"></div>
</div>

<div class="item">
<div class="key caption">Thumb</div>
<div class="icon">
<a href="link URL"><img width="65" height="65" src="image URL" /></a></div>
<div class="picture"></div>
</div>

<div class="item">
<div class="key caption">Thumb</div>
<div class="icon">
<a href="link URL"><img width="65" height="65" src="image URL" /></a></div>
<div class="picture"></div>
</div>

<div class="item">
<div class="key caption">Thumb</div>
<div class="icon">
<a href="link URL"><img width="65" height="65" src="image URL" /></a></div>
<div class="picture"></div>
</div>

</div>
</div>
</div>
Add the URLs of the links and the URLs of the images. The link URL is optional if you want to link the images to some posts.

If you add more images or remove some, you also need to change the width of the thumbnails, otherwise some pictures will appear behind the others.

To add more pictures, just add before the </div> in red a piece of code like this:

<div class="item">
<div class="key caption">Thumb</div>
<div class="icon">
<a href="link URL"><img width="65" height="65" src="image URL" /></a></div>
<div class="picture"></div>
</div>
To align the gadget just change the distance from the left (in green) to another value.
And the post title says it all. There are gadgets that sometimes we want to be visible only to us and not to our blog readers, perhaps a Survey already ended that we want to keep, a counter, or any gadget that while we customize, we don't want anyone else to see until the final result is ready.

blogger widgets, blogger tutorials
 The procedure is simple, we just have to add two lines to our gadget that we want to hide.
Blogger allows us to easily add a "Popular Posts" widget, that we select from its list of gadgets, and we can do that by going to the "Layout" of our Blog.

This gadget, as the name implies, shows which are the most visited blog posts, and you can set it to display the info you want in four possible combinations: (1) only the title of the post, (2) a thumbnail of the image and the post title, (3) post title with a summary, and (4) post title with a thumbnail and a post snippet.

This is an element that you shouldn't miss in your blog because it encourages your visitors to navigate through your content, which can result in higher income if you're monetizing your blog because it would generate an increase in the number of pages visited, and in turn, can attract the users' interest to subscribe to the blog and to read interesting content.
This Expandable Recent Comments is a very accessible widget that can be collapsed or expanded through user interaction, so that now, we don't have to click on the commenter or post title link in order to see the content of a comment.

recent comments widget, blogger gadgets, blogspot tricks

The expanding content can be shown or hidden by clicking on the plus/minus icon or by pressing the "Show all" or "Hide all" button at run time.

How To Add The Expandable Recent Comments Widget to Blogger

Step 1. Log in to your Blogger dashboard and go to Layout > Click on "Add a Gadget" link


Step 2. From the pop-up window, scroll down and click on the HTML/JavaScript widget


Step 3. Copy and paste this code inside the empty box:
<style type="text/css" media="screen">
.row-aa {        background: #f2f2f3; }
.row-bb {        background: #F8F5F1; }
.row-div { 
  margin:0px;
  padding:5px;
}
.comment-header {
  font-size:0.9em;
//  border:1px solid #E0E0E0;
//  background-color:#F3F3F3;
  padding:4px;
  margin-top:10px;
  margin-bottom:5px;
}
.comment-box {
  margin:0px;
  padding:0px;
  font-size:0.9em;
  height:500px;
  overflow:auto;
}
.comments1  { 
//  background: #F3F3F3;
  padding:3px;
  border-left:1px dashed #A6A6A6;
  color: #888888;
  font-style: italic;
  padding-top:4px;
  margin-bottom:5px;
}
.comment-footer {
  text-align:center;
  font-size:0.9em;
  padding:4px;
  margin-top:5px; 
}
</style>

<div style="text-align: center" class="comment-header"><input class="comment-button" id="commshowall" type="button" onclick="if (this.value == &#39;Show all&#39;) { unfold_all(this); this.value=&#39;Hide all&#39;; } else { fold_all(this); this.value=&#39;Show all&#39;; }" style="width:8em;font-size:1em;font-family:Verdana,sans" value="Show all" /></div>

<div class="comment-box">
<script type="text/javascript" src="http://helplogger.googlecode.com/svn/trunk/expandable-recent-comments.js"></script>
<script type="text/javascript"  src="http://awesomerich.blogspot.com//feeds/posts/default?start-index=1&max-results=999999&alt=json-in-script&callback=showrecentposts">
</script>
<script type="text/javascript"  src="http://awesomerich.blogspot.com//feeds/comments/default?start-index=1&max-results=999999&alt=json-in-script&callback=showrecentcomments">
</script>

</div>

Note: Replace http://awesomerich.blogspot.com/ with your blog/site address.

Step 4. Save your widget and you're done!
In the last tutorial, you learnt How to Add Different Backgrounds in Blogger Posts. Now this tutorial, will show you how you can have a different background for each of your page, thus giving your pages their own unique look. 

How to Add Different Background In Blogger Posts/Pages

Step 1. Log in to your Blogger Dashboard, then go to Template > Edit HTML.


The most strong and popular web design trend over last couple of years is a sliding horizontal panels also known as Sliders or Carousels. It's a very effective method to increase the web site usability and engage the user. This widget shows the most popular 10 posts on your blog just above your Blogger posts. You can see the Demo on my blog.

Let's start adding it

In the last tutorial, i've been talking about the Related Posts widget that shows related posts along with thumbnails just at the end of your blog articles. Some of the users, however, would prefer a simpler and cleaner displaying of their related posts so that it would show just the posts titles. So let's begin adding it!


related post, related post blogger, blogger tricks

Now here is a wonderful hack for displaying related posts beneath each of your blog posts, along with thumbnails. The related articles are chosen from other posts in that same category/label/tag. With this hack many of your readers will remain on your site for longer periods of time when they see related posts of interest.
related post, related posts blogger, blogger widgets
Steps adding the Related Posts Widget to Blogger/Blogspot

In this tutorial i will show you how to replace the 'Post A Comment' text that appears above the comment form with an image. Also, I will make available to you a few cool images or you can add your own image if you like... so let's get started.


In this tutorial i will show you how to add a cool floating Facebook like widget for Blogger that slides to the left on mouseover. Demo: You can see a static facebook badge at the right side of this blog


Newer Post, Home and Older Post are links that appear on the bottom of the posts. When a visitor click on one of these links, they will take him to the page with the list of your previous posts.
The number of the posts on these pages will be the same as the number of the posts on your main page.


This is called "Blogger/blogspot Title Swapping". Swapping blogs title can help boost your position in search engine results page listing and also increase clickthroughs. From an SEO (Search Engine Optimization) perspective, page title is the most important element in your blog in terms of ranking well in search engines. If you look at your browser's title bar you will notice that Blogger's default templates display your blog title in front of each page or post title. So page title would normally be displayed as:


search results, blogger seo, seo

blogger posts, gadgets for blogger, blogger tutorials

It has often been said that a picture says a thousand words, so in the struggle for the attention of the reader, we can add a picture or an icon to our post title, as I have put in the title of the post in the screenshot above.

Many of you maybe have wondered if it is possible to post Youtube videos and images into Blogger comments. With this trick it will (: But first of all, you should know that if you have blogger threaded comments activated, it won't work. So if you want to have this feature, firstly, you should remove blogger threaded comments.

Read here on How to Remove Blogger Threaded Comments.

How to add videos/images in Blogger comments

Step 1. Go to Dashboard >> Template >> Edit HTML (click on Proceed if needed)


The Blogger Threaded commenting system allows a reader to reply to other reader comments on that post. Blogger supports threaded commenting with two levels - the original comment, and the replies to that comment. If you want remove threaded comments from your blogger blog, follow these steps:


Step 1. Go To Blogger Dashboard > Template > Edit HTML (click on Proceed button if needed)


The Attribution gadget is the gadget in the footer that says "Powered By Blogger". If you have tried to remove this then you may of noticed this gadget is locked into you blog. To unlock it, follow the next steps:

blogger attribution, blogger hacks, powered by

In many Blogger templates there is a "subscribe to: Posts (Atom)" link, so that the blog visitors can subscribe to the Atom feeds. Considering the fact that many readers use RSS for their blog feeds, many of you could find this link pretty useless. Moreover it occupies space at the bottom of the template and it doesn't look nice at all. In this case you might want to remove it.

How to remove subscribe to: Posts (Atom) link? 

Step 1. Go to your Dashboard > Template > Edit HTML (click on Proceed button if needed)


The Random Posts Widget will show random posts you have added to your blog. The main advantages of this widget is that it is loading pretty fast and shows thumbnails of your posts too, along with the comments link.